This is another commissioned card to celebrate a colleagues 60th birthday with the brief being - pastel with a LARGE 60!!!
The card was made with Pink Pirouette and Whisper White with a dash of Pink Pirouette Taffeta Ribbon. To make the '60' I printed out the numbers from the computer, cut them out and used this as a template to draw onto the pink cardstock, which was then cut out to use as a base for the flowers. These were punched with an Itty Bitty Shapes punch and shaped by pressing the base of my white gel pen into the centre of the flower before glueing to the card numbers. I added non-SU pink pearls to the centres on the outside row of flowers. The sentiment is from the Hostess set, Happiest Birthday Wishes, and is matted onto Pink Pirouette cardstock and the word 'today' is cut with the Timeless Type Junior Alphabet dies. The tiny butterfly is one from the Beautiful Wings Embosslits die.
This is a wedding card I was asked to make using pale green so of course the colour I used was Certainly Celery. I stamped the hearts stamp from Confetti onto a strip of Whisper White, tied a knot of Taffeta Ribbon around, matted this onto a wider strip of Certainly Celery and added down the side of the base card (an A5 card blank, matted with Certainly Celery and Whisper White). The same stamp was stamped in Versamark, sprinkled with Heat'n'Stick and, after heating, added Dazzling Diamonds then punched out a large heart for the 'bride' and some small hearts using the Owl Builder punch and added some Basic Pearls to the top of the large heart to decorate. The 'groom' was made by punching two large hearts, one in white and one in black which had a 'v' cut in the centre to form the jacket. The bow tie was made with two more hearts from the Bird Builder punch and a small circle and the buttonhole is an Itty Bitty Punch with a tiny Basic Pearl in the centre. I added some Certainly Celery hearts down the left hand side and some glittery hearts down the right, a tag and a sentiment punched with the Jewelry Tag punch and Decorative Label punch respectively. I did make a bag to put the card in but obviously forgot to take a photo of it!
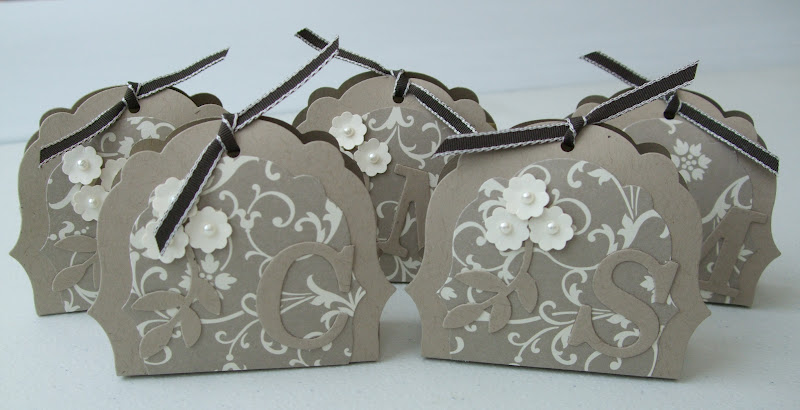
A while ago I showed you a card I made for a work colleagues 60th birthday and I have made this little matching gift bag to hold a small box of continental chocolates.
The bag is made with Whisper White cardstock as are the flowers, with a touch of Rose Red to add a little bit of colour (and to match the card!). The large flowers are made with the Blossom Party die, the smaller ones are punched from the Boho Blossoms punch and the leaves are cut with the Little Leaves die. I added a sentiment from Oval All, punched with the Oval Punch and matted onto a Rose Red Scallop Oval. The handles are made with Rose Red Seam Binding.
I hope you are making the most of this hot sunshine although, I have to say, I would have liked a bit of Spring in between Winter and Summer. Last week I was still wearing a winter coat and this week I'm too hot in a t-shirt!!
This is a card I've made for our school nurse who is leaving us to do further training. For this I just had to use the owl from the Owl Punch and dress her up as a nurse. Her body is Crumb Cake, her dress is Bashful Blue stripey DSP and her 'cape' wings are punched from the Bird Builder punch using Pacific Point. The hat is made by using the dress from the punch turned upside down with a cross punched with a punch from the Itty Bitty Punch Shapes Pack. I added a strip of white for the belt with a buckle made from Brushed Silver cardstock, as was the outer part of the fob watch, and the tie for the cape is some Bakers Twine. The flowers she is holding are another Itty Bitty punch, the frame is made with two of the Edgelits dies, the branch is from the Bird Builder punch and the letters are cut with the Timeless Type Junior Alphabet dies.
Where is the time going - it just seems to be running away at the moment. I have been busy making cards for orders but cannot post them on here just in case the recipients visit so, today I am showing you a card which I made a while ago. As with most of my punch art cards this was copied but I haven't a clue who came up with the original idea. It was made with a variety of SU punches and dies using Basic Gray, Whisper White and a touch of Basic Black and Pink Pirouette. After assembling the hippo he was matted onto a Top Note diecut which had been inked around the edges and then layered onto a white card blank. I chose the sentiment because of the 'hip-hip' as in hippo!! Both of the sentiments are from the hostess set, Happiest Birthday Wishes.
Isn't it lovely to see the sun, but the best bit is being able to throw open the doors and windows - at last!!
Tuesday 22 May 2012
The card I'm showing you today was a little experiment with one of the brand new Edgelits Dies from the Summer Mini. I cut one side of a piece of Cherry Cobbler cardstock with the die and then turned it round and cut the other side to match. This was placed in the centre of a white card blank before adding the sentiment, punched with the Extra Large Oval, in the centre. Some small flowers, from the Itty Bitty Punch Shapes Pack, were arranged and a Basic Rhinestone added to their centres. The card was finished off with a border stamp from Bordering on Romance.
Well it looks like summer has finally arrived so enjoy whatever you have planned for the week and I'll be back soon x
Regular readers of my blog will know that this weekend I have been away on a crafting Retreat where I met up again with some lovely ladies who I don't get to see very often. We shared a crafting area with the lovely Sue (a fellow SU demo) and her sister Carole and whilst we were there Sue created this gorgeous 3-fold card which I just had to show you (I did get Sue's permission first!) She used the new Framelits dies with Basic Gray cardstock and DSP (which I think is Baja Breeze) along with the Apothecary Art stamp set and butterflies from Beautiful Wings Embosslits die. I think this would make a lovely card/gift if a photograph was added to the second layer of the card (picture top right). Thanks for sharing Sue - it's beautiful.
I have to say a big thank you to Michelle & Marguerite for their hard work in making it such a great weekend for us all and also to Sue, Carole, Sandie, Suezanne, Lynney, Jade and her auntie for being such great company - hope to see you all again soon.
On a final note I apologise in advance for the lack of posts this coming week - Blogger had decided I'm using too much space so I am going to have to go back to the start of my blog and delete some of the old to make way for the new. Unfortunately, having been away all weekend, I have more pressing things to do at the moment than sort my blog but I will do so as quickly as I can. I think I can manage a couple more posts but that's about it until I get it sorted. In the meantime have a great week and I'll be back soon x
Today I am showing you some little gifts I have made with the new Framelits dies. It is always very difficult to see the size of things from photographs so, to give you an idea, the picture top right shows the boxes next to a 50p piece.
To make them I cut two Framelits from Crumb Cake cardstock and cut off the bottom curve, these were then glued to a box which measured H3cm x W6cm x D2cm which I had also made from Crumb Cake. The Elegant Soiree DSP was cut with a smaller Framelits die and glued onto the front and back, then decorated with Very Vanilla flowers (Itty Bitty Punch Shapes Pack), a branch from the Bird Builder Punch and an initial cut with the Timeless Type Junior Alphabet dies. To fix the top I punched a hole with the small handheld punch, threaded a length of Early Espresso narrow taffeta ribbon through and tied in a knot. The boxes hold a small button shaped soap.
Quite a simple card to show you today using the new Twitterpated DSP from the Summer Mini. I punched three different patterns of DSP with the Square punch to make the parcels and added a strip of Wild Wasabi down the front as the ribbon. The 'bows' were made with cut off pieces from the Lace Ribbon Border punch and glued onto the top of the punched squares. The parcels were added to a piece of Whisper White cardstock which had been matted onto Wild Wasabi and some Bakers Twine was wrapped around one end before fixing on to a white card blank. The tag is a stamp from Happiest Birthday Wishes Hostess set, tied to the Bakers Twine with a bow, and the sentiment is a SAB stamp (now retired).
I am not sure when I will be posting next as I am away at Michelle's Retreat this weekend - I am so looking forward to it. If last year is anything to go by I probably won't get much crafting done but, one thing is for sure, I will be in the company of some lovely people and will definitely eat a lot!!! So please check back in because, even if I don't get a chance to post over the weekend, I will be back at the beginning of the week and I'm sure I will have some lovely things from the Retreat to share with you.
Here is another card I have made for Jo Street's Candlelighters Appeal and uses the A La Carte stamp Elebration. If you haven't already seen the appeal on Jo's blog then click here to read it. I stamped the elephant in Basic Gray onto Whisper White cardstock and then coloured in the image using my blender pen. I matted this onto a piece of Bashful Blue cardstock and tied a knot of (retired) Bashful Blue ribbon around. The card is a white A6 blank with a strip of the dotty DSP taken from the Subtles Paper Stack with the sentiments punched with the Word Window and Modern Label punches. The pearls are from my non-SU stash.
Here are two more cards I have made to send to Jo to sell for the Candlelighters Appeal (see previous posts for more info) and it was the perfect excuse for me to use my Love & Laughter stamp set which is brand new in the Summer Mini. For the top card I embossed the wedding dress stamp in silver and cut one end of the card with one of the Edgelits dies and then matted it onto a longer piece of Basic Black cardstock which had also had one end shaped with the die. This was then layered onto a white card blank and some Basic Rhinestones added down the side. The sentiment (also from love & Laughter) was silver embossed, punched with the Curly Label punch and matted onto a Basic Black Decorative Label with a couple of Basic Rhinestones added. The second card was also made with a silver embossed image and matted on Basic Black. A piece of Whisper White was embossed at the top and bottom with the heart folder from the Textured Impressions Embossing Folders set. matted onto Basic Black and then layered onto a white card blank. The silver embossed sentiment was punched with the Modern label punch and added to the bottom of the card.
The Simply Stampin' challenge this week is certainly what you would call a challenge - the DT want us to come up with something made with Regal Rose, Real Red, Island Indigo and Whisper White. At the end of the post they said that they hoped the colour challenge wouldn't have us 'running for the hills' - well the only reason I didn't is because the hills are too far away!!!!
Definitely not a colour combo I would choose but it gave me a chance to try something I've seen done many times before but never actually got round to doing. I practised with circles but you could use any shape you like for this technique and, having seen the finished effect, it's definitely something I'll be doing again (just maybe not these colours!)
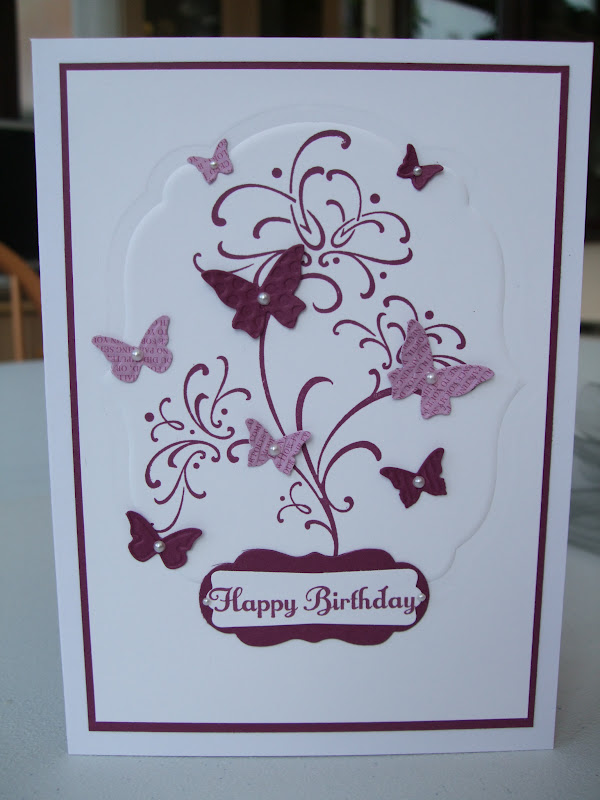
I started by punching different size circles from the coloured cardstock and then arranged them onto a piece of Whisper White card, when I was happy with how they looked I glued them using a wet glue to make sure they were properly stuck all over. I then simply ran the whole thing through the BigShot in the Square Lattice Embossing folder. This was then matted onto a piece of Island Indigo cardsock and then onto a card blank. The sentiment, from the Hostess set, Happiest Birthday Wishes. was stamped in Island Indigo, cut into a banner and inked around the edges with a sponge dauber.
Here is a close up of the finished effect. This particular embossing folder gives a lovely texture to the cardstock and it actually looks like the colours are painted on rather than glued on pieces of card!
*If you saw my previous post you will know that a lady called Jo Street (her post is here) has made an appeal for donations of cards to sell, to raise money for the Candlelighters Appeal, at a Ladies Night on the 31st May. Sadly it is too late for 3 year old Florence for anything other than to receive the vital care & support from Candlelighters that she and her family need at this desperate time. As a Granny to four toddlers it breaks my heart to think what this family must be going through so I urge you, even if you only send one card, please get in touch with Jo. Her contact details are on her post that I've linked to above. PLEASE let's help Jo raise lots of money.
Whilst having a look at the Candlelighters website I came across this video which Scalby School Girls recorded last year in aid of the charity - take a look
My card today is a dual purpose card and uses the cute Young Vermillion. The challenge this week at CAS-ual Fridays is a CAS card using a bird and I also wanted to make some cards for a charity appeal so I thought I would kill two birds with one stone so to speak. As you will know by now I am a huge fan of Vicky (aka Crafting Clare) and when I visited her blog yesterday she had written about an appeal by Jo Street (view Jo's blog here) - this is what Vicky wrote;
I always like to feel that our crafting can help others. I was reading this post by Jo Street of Dinky Daisy Designs yesterday - she has been devastated by the plight of a little girl at a playgroup her son attends. Jo wants to do something to help so she's holding a sale of cards to raise money for Candlelighters, the organisation which will be caring for the little girl and supporting her stricken family. It seems to me that it's easy to make two cards if you're making one and I think lots of us could spare some from our stash, so do pop over to Jo's blog and offer your services.
I completely echo Vicky's last statement so if you can spare a card or two please get in touch with Jo and let's help her raise a lot of money to help this very worthwhile cause.
Now onto the card - I stamped the bird onto a piece of Naturals Ivory cardstock in Early Espresso and blended the colour with a blender pen then I embossed the bottom section of the cardstock with the Stripes Embossing Folder and tied round some Linen Thread before matting onto a piece of Cherry Cobbler cardstock and fixing to a white card blank. I made a frame from Cherry Cobbler cardstock using the Framelits dies and positioned this over the bird using silicone glue to raise the frame up a little. The sentiment was punched with the Word Window punch and matted onto a Modern Label.
Enjoy the rest of the weekend and the sunshine (while it lasts!) x
Making cards was not on my agenda for this morning as I have so many other jobs to do this weekend but when I saw the Less is More challenge - One Layer, 3 Stamps - an idea immediately sprang to mind (believe me that doesn't happen often!) so I had to go and get it out of my system.
I know a lot of people struggle with One Layer, CAS cards but I think they are my all time favourite - Less is More as they say!!!!
I have used two stamps from the brand new Bordering on Romance set, which is available in the Summer Mini, and a sentiment from Curvy Verses which were all coloured with Tangerine Tango and Old Olive markers. It was then a simple job to colour in the leaves and the flowers with a blender pen and, just to add a bit of interest, I scored two lines in the corner where the image is. Job done!
Come back tomorrow to see a card I have made for a charity appeal but in the meantime have a great weekend and enjoy the sunshine - while it lasts x
Friday 11 May 2012
Another commissioned card with the brief - butterflies, not too girly and a nickname (real name Louise!) - so I'm just hoping this will fit the bill. I used a colour theme of Elegant Eggplant (my all time favourite colour) and Whisper White. I began by doing the matting and layering and used a white DL card blank topped with Elegant Eggplant, then Whisper White and finished with Elegant Eggplant DSP from the Rich Regals Paper Stack. The letters are from the Letter It Alphabet set, stamped in Elegant Eggplant onto Whisper White and cut out. After glueing them in place I added a Basic Rhinestone between each letter, these letters do look great curved with a brad in between but on this occasion I wanted them to be flat. The sentiment is from a SAB set and punched with the Curly label punch, inked around the edge and matted onto an Elegant Eggplant Decorative Label. The butterflies are, of course, from the Beautiful Wings Embosslits die in Elegant Eggplant and Whisper White with a Basic Rhinestone in the centre.
Would you believe it - I actually know who I CASE'd my Punch Art car from!! I have to say that Lee Ann Greff had CASE'd it from someone else but I can't trace it back much further so my credit stops with her :0)
The car is made with various SU punches, these are listed on Lee Ann's site (click on her name above to go to her site), and Real Red, Basic Black and Brushed Silver cardstock.
I wanted the background to look like a road so I took a piece of Basic Gray cardstock, slightly smaller than my card blank, and used the Sandy Speckles wheel with Basic Black before adding a strip of Whisper White down the centre. I added a tiny Silver Brad at each corner before positioning the car onto the card.
These cards were made with the a la carte stamp 'Young Vemillion' stamped in Soft Suede. For the one on the left I took a piece of DSP from the Neutrals Paper Stack and embossed a frame using a folder from the Designer Frames Embossing set, this was then matted onto Soft Suede cardstock, and some Soft Suede Taffeta ribbon tied around before fixing onto a card blank made with Natural Ivory cardstock. The Young Vermillion, which had been stamped onto Very Vanilla, was cut out to fit in the frame and a sentiment from a retired set stamped on the right.
The other card was made using the same colours with Linen Thread added to the Very Vanilla panel and the sentiment punched with the Modern label punch.
Today's card is using one of the Framelits dies to emboss rather than to cut. This is done by placing the cardstock on the non-cutting side of the die and using a silicone mat along with the die cutting machine plate(s). As all machines are different you do have to play around with this to make sure you get the sandwich right but it is worth it in the end, so I suggest you use some scrap card to start with and once you get the sandwich right, write it down because, if you're anything like me, you'll never remember next time!
After embossing a piece of Whisper White I then used the negative part of the diecut as a mask and stamped the image from Wedding Sweet in Rich Razzleberry. Perfect Plum and Rich Razzleberry butterflies, cut with the Beautiful Wings Embosslits Die, were scattered around and some Perfect Pearls added to their bodies. The sentiment was punched with the Modern label punch and layered onto a Rich Razzleberry label which is cut with one of the Lots of Tags dies. This was layered onto a piece of Rich Razzleberry cardstock before glueing onto a card blank.
Today's card is one which I CASE'd from Lynney, a fellow SU team member (you can see her card here). As soon as I saw it I knew I was going to have to make one as it is so clean and simple but at the same time beautiful, so thanks Lynney for the inspiration.
I have made mine for a work colleague who will be 60 very soon and so have added a bit to the card. I started with a Rose Red card base and then added the Whisper White layer which had been partially embossed with the Stripes Embossing Folder. The flowers are cut with the Blossom Party die (this was in the Spring Mini so is no longer available but hopefully it will make it into the main catalogue in October) and I slightly curled the petals before glueing two together and adding to the card. The centres are punched with the 1/2 inch punch and rounded, I do this by placing the circle on the pricking mat and going round in a circular motion with the end of my pricking tool, these were then placed in the centre of the flowers using a dimensional. The sentiment is from the hostess set 'Happiest Birthday Wishes'. As it is a special birthday I cut the numbers from Whisper White using the Timeless Type Junior Alphabet die and added a tag saying 'today' punched with the Jewelry Tag Punch, finished with a Basic Pearl.
Have a lovely Bank Holiday and, now it's out of the way, let's hope we start to see some warmer weather :0)
This was made for the Mum of a friend at work who, apparently, loves owls. I used the Owl Punch to make the little character along with the Bird Punch for the wings and she is punched from Crumb Cake. Her dress is made from some retired DSP, just because it is pretty and matched the Rose Red cardstock I used for the heart, flowers and butterflies. The branches she is sitting on are stamped with a stamp from, the now retired Borderlines, stamped in Old Olive and then stamped again without re-inking to get the different shades of green. The butterflies were made with the Beautiful Wings Embosslits die and the flowers punched with the Itty Bitty Shapes Punch Pack. The Happy Birthday is from a SAB set and the Mum is from For my Family. The card front is matted onto Old Olive cardstock and then onto a white square card blank. Some Basic Pearls were added to the centres of the butterflies and flowers.
The first thing I do at 8 o'clock on a Saturday morning is look at the challenge for the week over at Less is More and I have to say I didn't like what I saw this morning - a colour challenge using Yellow - because I'm not a great fan of this particular colour. So onto my next stop which is always the Simply Stampin' challenge where I find a sketch for this week (top right).
So my very own challenge this week is to use yellow with the sketch :0)
I used So Saffron for my base card and used a piece of Whisper White as a mat. Before fixing this to the card blank I partially embossed two horizontal lines, using the Stripes Embossing folder, down the RH side of the card and then attached a knot of So Saffron Taffeta ribbon across the card. I then cut a piece of Whisper White using the smallest of the Framelits dies and a So Saffron frame using the smallest die and the next size up. An image from Bright Blossoms was coloured with Daffodil Delight and Old Olive markers and stamped onto the white die cut (I have this set in clear mount so I didn't even need to use my stamp-a-ma-jig!) This was positioned onto the card before adding a tiny flower, punched with the Itty BittyShapes Punch , with a Basic Pearl in the centre and some more pearls underlining the sentiment. The bottom picture shows the inside of the card (which for some reason, despite taking 10 photos, I couldn't seem to get in focus!) and this is a diecut using the largest of the Framelits dies with the flower from Create a Cupcake stamped in one corner.
I hope you all have a lovely Bank Holiday weekend and now I must go and get ready for my grandchildren who are coming to visit this afternoon - although I think the housework would be best left until they are gone :0)
Something a bit different today - my attempt at a Punch Art version of Bullseye, the horse from Toy Story! Notice I said 'attempt' as he's a bit odd looking but my daughter assures me, even if it only looks a little bit like him, my grandson will love it - let's hope so :0)
He was made with a variety of punches and, in all honesty, I messed about with it for so long I can't even remember which ones I used in the end. His stable is a piece of Crumb Cake cardstock marked with an Early Espresso marker and cut at the top. The centre was cut with a non-SU die and a piece of Early Espresso cardstock put in the aperture. The number and letters were cut, in Toy Story colours (Pacific Point & Daffodil Delight), with the Timeless Type Junior Alphabet dies and the 4 was matted onto a piece of Daffodil Delight cardstock cut with the Decorative label punch and 'hung' with some Linen Thread. The Old Olive leaves were from the Bird Builder punch and the 'shoes' were made with Brushed Silver cardstock and two circle punches, hanging on nails made with another circle punch.
Here is another card which I was asked to make for a very special 80th birthday. I used the Blossom Party die which, unfortunately, was only available in the Spring Mini but let's hope it makes it's way into the new main catalogue in October. This is a lovely die and one which I probably use more than any other as you can make so many different flowers using different layer combinations. The DSP is from the brand new Twitterpated available in the Summer Mini, the leaves are cut with the Little Leaves Sizzlits die (in Old Olive & Certainly Celery) and the tiny flowers are punched with the Boho Blossoms punch. 'Mum' is from For my Family, 'Happy' is a retired stamp and the 'th and birthday' are part of a stamp from Perfect Punches inked with an Old Olive marker. I cut the 80 from the Timeless Type Junior Alphabet dies in Old Olive and some Basic Pearls were added to finish the card off. The A5 base card is Old Olive matted with Whisper White. I made a bag to put the card in, decorated with leaves, some tiny flowers and the sentiments with handles made from Old Olive satin ribbon.
I had the loveliest surprise yesterday when I arrived at work - a box containing this beautiful cupcake which had been sent from Katherine, the partner of a friend at work. Just look at all that sparkly edible glitter on the top - and I assure you it tasted as good as it looked!! The photos could have been better but the light was bad and there was no way I was going to resist eating it until this morning :0)
Above right is the 'cupcake' thank you card I made to send to her. Using the Create-a-Cupcake set (which sadly is no longer available), the Scallop Circle and Large Scallop Circle, Melon Mambo, Pretty in Pink and Dazzling Diamonds.
The gift was such a lovely thought and brightened up what was otherwise a dreary day!!