Pages

Monday 30 January 2012

Lavender Sachets


Something a little different to show you today - some lavender wardrobe sachets I made with the lovely Deck the Halls fabric from SU. I cut the material out with the Scallop Square die and, as I don't sew, glued three sides with fabric glue, stuffed them with some wadding on which I had sprinkled some Lavender Oil, and then glued the remaining side. I added a loop of Crumb Cake Taffeta Ribbon, a piece of Crochet Trim and a button to one corner (and yes I did sew these on!) As I wanted to give these as gifts I packaged them in a card bag which had been lined with a piece of co-ordinating cardstock and made a topper which was stamped with the branch from Hopeful Thoughts and a sentiment.
Apologies for the quality of the photos but I had already sealed the packages before I remembered to take the photos!!!

Sunday 29 January 2012

Simply Stampin' Colour Challenge


Over at Simply Stampin' this week there is a colour challenge using Not Quite Navy, Early Espresso, River Rock & Very Vanilla and this is my card. As the colours were suitable for a male card I decided to use the challenge to make a birthday card for my Dad who, as you can see, will be 90!
I don't know if there is a proper name for this style of card but if there is I don't know it so, in a nutshell, it is a piece of A4 (portrait) cut at approx 15cm then turned landscape and scored at 10.5cm to form the flap. The small scene was made by using a clear block, inked with N.Q.Navy, then stamped onto Whisper White, then repeating this with River Rock and stamping underneath the first block. I then stamped the trees from Lovely as a Tree in Early Espresso and cut down to size. This was matted and layered onto River Rock, N.Q.Navy and Very Vanilla and positioned on the flap of the N.Q.Navy card base. The piece of Very Vanilla for the rest of the card was stamped, again with the trees in Early Espresso and glued in place. The banner is River Rock stamped with 'dad' from the For My Family set, attached with a Metallic Brad, and the sentiment is one of the stamps in Happiest Birthday Wishes coloured with a marker so I could split the sentiment up and place the 90, cut with the Timeless Type Alphabet Dies, in between the words.

In my quest to make the tree scene I ended up with a few rejects but decided this one wasn't too bad to use for another card. Still using all the same colours but this one was far less time consuming - in fact it was thrown together in just a few minutes - which you can probably tell!!!  :0)
Just before I go I would like to thank the design team over at Simply Stampin' for putting me in the Top 3 again this week - thank you ladies for that and for all the lovely comments, I really appreciate it. x

Saturday 28 January 2012

Variation on a Sketch!


This afternoon my daughter asked me to make her a baby card for her friends new baby who arrived yesterday and, as she needs it very soon, I decided to make it along the same lines as the one I made earlier for the Less is More challenge (scroll down to previous post to see that one!) It was made in exactly the same way but using Pretty in Pink DSP, from the Subtles Paper Stack, and the little bunny stamp from Perfect Postage and tied with Whisper White Organza ribbon. I stamped the sentiment and underneath put the baby's name which I made with the Timeless Type Junior Alphabet dies, run through the Perfect Polka Dots Embossing Folder, and dotted the'i' with a Basic Pearl. 
I have to say I'm not very good with pale pink and always seem to get a mental block when it comes to designing anything with it so I was really glad I didn't have to start from scratch with the idea!

Less is More - Sketch

 
I'm back this morning with a card for the Less is More challenge which, this week, is a sketch (shown above right). I've been experimenting lately with mixing colours and 'not quite so simple' layouts so, for this challenge, I thought I would revert back to my type of cards and I have to say it's good to be back!!
I started this card with a strip of River Rock DSP from the Neutrals Paper Stack and embossed it using the oval from the Designer Frames Embossing set. I coloured the image from the new stamp set Fruit & Flowers, available in the Spring Mini, with River Rock and Cherry Cobbler markers and stamped once onto a piece of Whisper White then, without re-inking, stamped again three times to give a faded image around the original. This was punched out with the Extra-Large Oval punch and positioned in the frame. A piece of Cherry Cobbler Seam Binding was tied around the panel before matting onto a DL card blank. The sentiment from Curly Cute was stamped directly onto the card blank in Cherry Cobbler. Thank you ladies, I'm loving this challenge!
I want to thank everyone for their get well wishes this week, they cheered me up no end. I decided to return to work on Friday, after being off all week, to be greeted by comments such as "you look very pale" and "you still sound awful" - which made me feel a whole lot better :0) Anyway, despite not having completely got rid of the bug, I am feeling a whole lot better than I did!!
Have a great weekend and come back to visit soon x

Friday 27 January 2012

One Sheet Wonder


Lots of cards to look at today and all from one sheet of A4 cardstock (well the patterned bits that is!) I have never tried the one-sheet wonder before but decided to have a go and this is what I've done with it. There are lots of templates and ideas out there in cyber-land for the one-sheet wonders and I used a mixture of some of these and a bit of my own. The top-left photo shows my sheet of A4 after being stamped using Circle Circus in Rose Red, Not Quite Navy and River Rock before being chopped up to make the cards. I think Circle Circus is a really good set for this as it contains a lot of sizes and some solid stamps and some which are ideal for 'filling in', but any stamp set can be used and any colours. If you don't want to be bothered stamping a sheet, or simply wish to save time, SU have some fabulous DSP's which could be used instead. It is a great way to make several cards at once as you pick a colour scheme and have your ribbons, inks & cardstock all to hand and, an added bonus, also saves time on cleaning those stamps! I used a variety of sentiments and punches but you can use anything that takes your fancy.
Well it's Friday again so, whatever your plans for the weekend I hope you have a good one. I'm sure I will be back tomorrow for the Less is More challenge so do pop back sometime x

Thursday 26 January 2012

ColourQ Challenge - again!

  
You may have read yesterday that my original idea for this week's ColourQ challenge hadn't quite come together so I abandoned it and made one completely different. Well not to be beaten I went back to it and here it is - absolutely nothing like the original idea I had in my head but finished nevertheless. I began by taking a piece of Riding Hood Red cardstock and glueing two narrower strips of Old Olive and More Mustard on to it before running through the Stripes Embossing Folder. I matted this onto some Crumb Cake cardstock and punched out a circle through all the layers to allow the white card blank to show through, and made a frame for the aperture using two circle punches. I then added my sentiment to the base card using my stamp-a-ma-Jig in R.H.Red and, before fixing the top layer on, I tied a knot of Crumb Cake Taffeta ribbon around and added some small coloured circles down the edge to finish the card off.

Wednesday 25 January 2012

ColourQ Challenge


The ColourQ challenge this week is based on the patterned skirt above and, as you can see, uses Riding Hood Red, Old Olive, More Mustard, Kraft (or Crumb Cake as we know it) and white. I attempted to make a male card using embossed strips of card but couldn't quite get it to look how I wanted so I may be back with that another day! 
So onto the one I did manage to make - I started by stamping the flowers from Everything Eleanor in Riding Hood Red and More Mustard using the rock'n'roll technique. I used my blender pen to colour in the flowers, some by just blending the ink already there and others I added more ink to get a stronger colour, and then cut them out. A piece of Whisper White cardstock was matted onto a Crumb Cake card blank and the background stamp, again from Everything Eleanor was stamped in Crumb Cake. I added some leafy branches in Old Olive using a stamp from Vintage Vogue, some of which I stamped off first to give a lighter colour. I then arranged the flowers and when I was happy with the positioning I glued the small flowers down first and then curled the larger flowers and stuck these with dimensionals to give some depth. The sentiment is from Sincere Salutations, stamped in R.H.Red and the 'bunny ears' bow is made with R.H.Red Tafffeta Ribbon.
Some news from last week's challenge is that my Paisley Petals entry was picked as a 'ColourQ Courtiers' card - how good is that? I'm not too sure I deserved it as there were some brilliant entries but a big thank you to the design team anyway :0) 

More Colour Mixing!


I'm really going against the grain with this card in my effort to use DIFFERENT colour combos! Although this one is quite subtle it is still using a mix of colours that I would usually steer clear of. I have used a base card of Naturals Ivory with a strip of Crumb Cake DSP, from the Neutrals Paper Stack. going across the card. I punched four 1" circles in Bravo Burgundy, Old Olive, Pacific Point & Wisteria Wonder and adhered these to the back of the Lace Ribbon Border, punched from Crumb Cake cardstock. This was fixed down the side of the card and a piece of Very Vanilla, punched with Dotted Scallop Ribbon Border punch, placed alongside and the tiny dots were punched with a small circle punch. The sentiment is from Happiest Birthday Wishes and stamped in Pacific Point.

Tuesday 24 January 2012

Perfect Postage

 The heart card I showed you yesterday was made with a stamp from Perfect Postage and today I have three cards to share using the rest of the set.


The first one uses the cake stamp which I coloured with Daffodil Delight, Pacific Point & Crumb Cake markers. I punched them out with a circle punch, inked around the edge and matted them onto a larger circle of Pacific Point. They were placed onto a rectangle of Very Vanilla cardstock and a sentiment, from Happiest Birthday Wishes, was stamped in Pacific Point towards the bottom of the card. A knot of Crumb Cake Seam Binding was placed around the card and the whole thing was matted onto a Crumb Cake card blank.


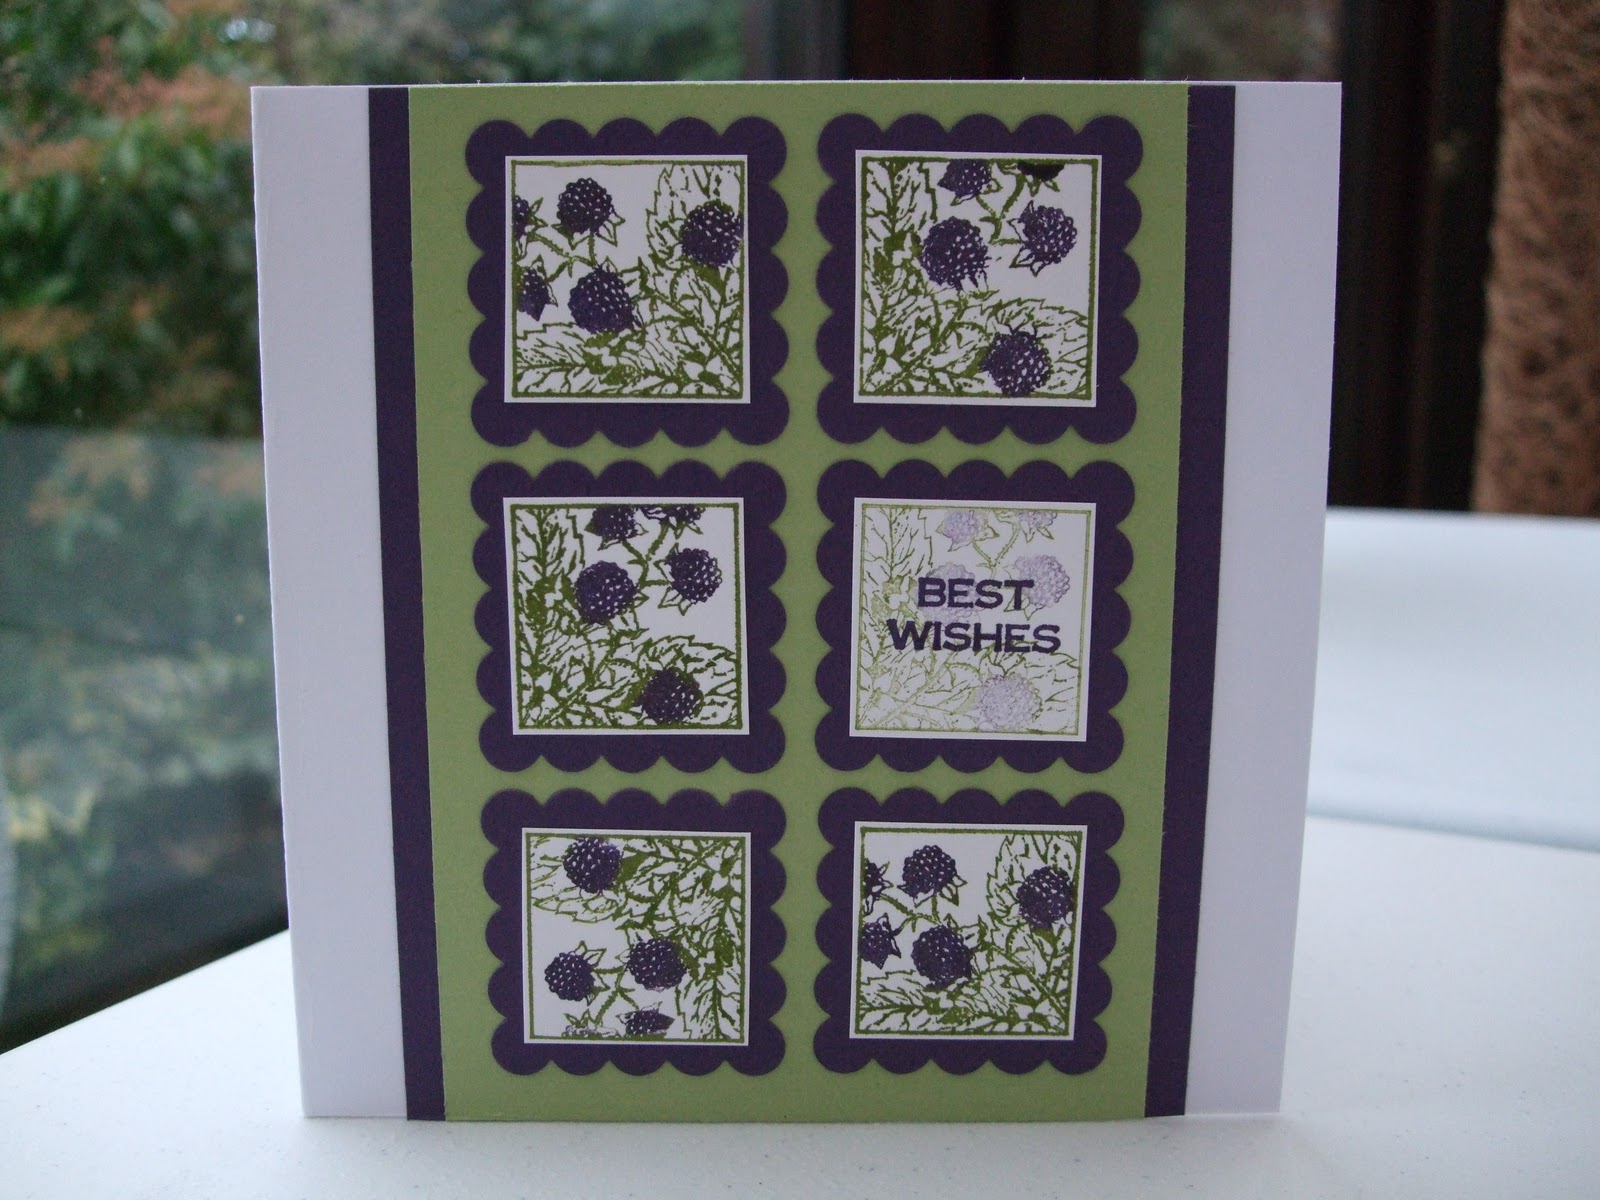
The next one is the 'bramble' stamp which again was coloured with markers in Elegant Eggplant and Old Olive. I stamped five of these and a sixth one was stamped off so it just left a very faint image enabling me to stamp the sentiment on top. These were cut out leaving a thin white border around the image and then layered onto an Elegant Eggplant Scallop Square. The base layers were made with Elegant Eggplant and Old Olive cardstock glued onto a plain white card blank and the Scallop Squares positioned on top.


The last card shows the 'bunny' stamp which I stamped in So Saffron, Pretty in Pink, Pool Party, Bashful Blue and Certainly Celery. These were cut out with a circle punch and matted onto a Scallop Square punched from the corresponding colours in the DSP Paper Stacks. I cut a piece of white cardstock, just a bit smaller than a C6 card blank, and ran it through the Stripes Embossing Folder and then inked all around the edges with Pink Pirouette, glued the Scallop Squares into position and then layered the whole thing onto a card blank.


It only occurred to me while I was typing this post that, from just one set of four stamps, I have made cards suitable for Valentine's Day/Anniversary, a male birthday, a New Baby and an 'any other' occasion. There aren't many stamp sets that can cover so many different occasions and all with four stamps! At £10.95 for wood mount (£8.95 for clear) it's an absolute must-have but, remember, it's only available from the Spring Mini until 30th April so why not add it to your £45 wish list to qualify for your free SAB sets?


On a final note for today I wanted to share one of my 3-year old grandsons creations which he made at pre-school yesterday. It was for his Mummy and was made to celebrate the Chinese New Year. It was a red envelope which contained a gold chocolate coin and the gold painting on the front was his version of a dragon (I'm not sure but it looks like it could have been a rubber stamp!!)

Sale-a-Bration is here!


Yes it's Sale-a-Bration time again which, this year, runs from 24th Jan - 31st March. For every £45* you spend you can choose one of the four stamp sets or a pack of the Designer Paper, shown in the SAB catalogue, absolutely FREE! Host a qualifying workshop during the SAB period and you get even more freebies than usual or why not take the plunge and become a demonstrator yourself. For more information please feel free to contact me for a 'no obligation' chat. Take a look through the catalogue(s) and start that wish list while you can get more for your money!
* £45 is not accumulative and must be spent on one order

Monday 23 January 2012

Lots of Hearts


I have another card to show you which I am entering for this weeks Simply Stampin’ Sketch challenge, using a stamp from Perfect Postage, a new stamp set available from the Spring Mini catalogue. One of the many advantages of being a Stampin’Up! Demonstrator is that you get to earn incentives and this set was one which I received. I will be honest with you and say that, until the other day, this set had not even seen an ink pad but I thought this set lent itself perfectly to the challenge for this week.
Here I have used the heart stamp, stamped in Real Red, and cut out by hand. The set does have a co-ordinating Postage Stamp punch to go with it but, as yet, I haven’t got this so scissors it is! I layered these onto Basic Black, punched with the large square punch, and then positioned them on a piece of Real Red cardstock which had been matted onto Basic Black and tied a knot of  Satin Ribbon around before mounting onto a white card blank. I didn’t have a suitable sentiment small enough to go into the heart so I used two different stamps and coloured the words ‘love’ and ‘you’ with a marker using the masking technique and my Stamp-a-ma-Jig.
Come back tomorrow to see a second card made with another stamp from this set.
Unfortunately my cold (and particularly my head) is no better so I am off work today. Why is it that I moan about having to go but I do hate being off?  It’s very rare that I am off sick so, when I am, they know it’s genuine but I always feel SO guilty!!

Sunday 22 January 2012


I have been invited to a work colleague's 40th birthday bash and, not really knowing what to buy her, I plumped for a posh bottle of Cava in a sophisticated matt black bottle complete with a gold label. So I just had to make her card to match! I used a piece of the Brushed Gold cardstock with a stamp from Just Believe and the retired 'happy' stamp inked with StazOn (I also added the 'th' from a birthday sentiment which had been masked with a post-it before inking). This was matted onto Basic Black with a bow made from Basic Black satin ribbon and then onto a white card blank. I cut out some butterflies from Brushed Gold cardstock with the Beautiful Wings Embosslits die and added these to the card along with the 40 from the Timeless Type Junior Alphabet die. The bubbly was wrapped in cellophane and tied with Basic Black Striped Grosgrain ribbon and the tag made with the Two Tags die, Scallop Circle, 5-Petal Flower and Boho Blossoms punches and the name was written on a Modern Label punch.
What a weekend, I started off fine on Saturday morning and by the afternoon I was absolutely full of cold, coughing like mad and with a head that feels like it's about to explode. So sitting here, all wrapped up, feeling very sorry for myself having not set foot outside the door since Friday evening. Oh well at least there's a couple of things to watch on the TV tonight (thats if I can stay awake that long!!).
Hope you've all had a good weekend and I'll be back soon :0)

Saturday 21 January 2012

Two Challenges in One!


I'm rolling two challenges into one today as my internet connection is SO rubbish at the moment I thought I would very likely have problems posting!
The LIM challenge this week is 'Cut it Out' where the requirement is some kind of aperture and the Simply Stampin' challenge is a sketch using six squares and a sentiment.
I started by making a 'widow frame' in a piece of Chocolate Chip using my large square punch and then cut a piece of Whisper White cardstock the same size. I stamped the flower spray from Hopeful Thoughts in Old Olive and then added Wisteria Wonder flowers punched with one of the Itty Bitty Punch Shapes set. I added some tiny Basic Pearls to the centres and then stamped the sentiment from Petite Pairs in Old Olive. The Whisper White panel was then glued to a plain white card blank and the window frame positioned on top using dimensionals.
I will apologise now for the probable lack of commenting this week but I have lost the connection no less than 6 times while attempting to do this post - SO FRUSTRATING!!
Related Posts Plugin for WordPress, Blogger...